Whether you choose
glass or
plastic, understanding the architecture of bottle and the terminology used can help you choose the right bottle for your application.
The Opening
The cap on your bottle has to fit correctly to prevent leakage, evaporation and potentially dangerous spills. What many don't know is how to make sure the cap is the right size for the bottle. Also called the "mouth" of the bottle, the opening ranges from narrow to wide mouth. Depending on your application, the opening of the bottle may be critical to how the contents are filled and dispensed.During the bottle selection process, a common bottle part often referred to is the "neck finish". This is represented as the outer diameter of the neck of the bottle (in millimeters). Along with the neck finish, "thread finish" is another common bottle part phrase. This is the height of the cap and the style of threads on the bottle and corresponding cap.Before you select a cap for your bottle, you need to know the correct size or Neck Finish of the bottle. These sizes are not interchangeable-a 28-400 cap will not fit properly on a bottle with a 28-410 neck finish.
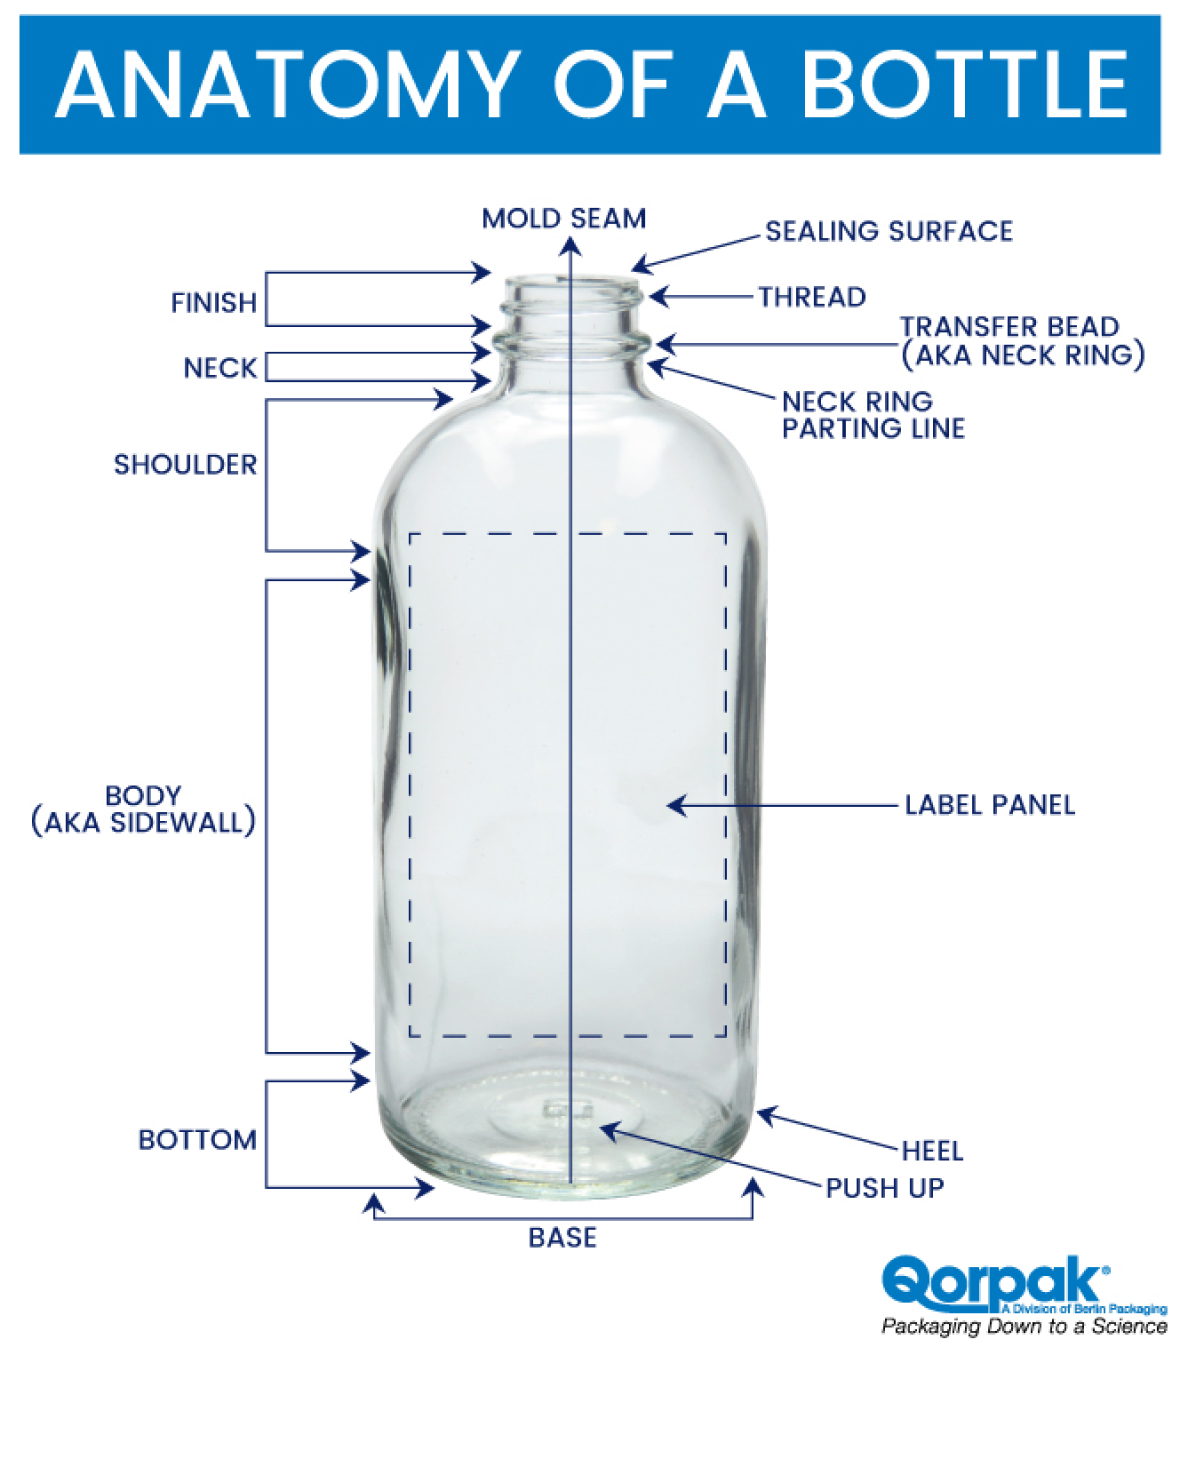
Bottle Opening anatomy terms
The portion of the container that is above the shoulder and below the finish. The neck is where the cross-section of the bottle grows smaller to join the finish.
The top part of the container, above the neck, is shaped to accommodate a specific closure size. The term "finish" comes from a time when the finish was the last part of the bottle molding process.
A spiral-shaped ridge on the finish of a bottle intended to mesh with a similarly sized screw-type closure to seal the container.
The flat, circular top surface of the finish which makes direct contact with the closure to form a seal. It's sometimes referred to as the "land". If the sealing surface is not flat, the container could leak.
Neck ring or transfer bed
A horizontal ridge at the base of the finish used for transferring the bottle from one part of the production process to the next.
The seam at the base of the transfer bead between the neck and finish of the bottle. It marks the joining of the finish to the bottle's body.
The Body
The body of the bottle has important qualities that play a role in determining what the best bottle is for its intended use. The shape of the bottles body and its capacity are the most common selection factors.Round bottles can provide for greater comfort and less hand fatigue when dispensing. Square and rectangular bottles are ideal for allowing for maximum storage on the workbench.Capacity is typically shown as the amount of space inside a container for a given amount of product. The packaging industry uses standard sizes, usually represented in ml (also known as cc), drams and ounces. When a bottle is filled to this capacity, the contents generally fill the container to its shoulder area.Overflow capacity is the maximum volume of a bottle if the contents were filled to the very top (or the brim). Headspace is the area above the contents of the container and below the neck opening and may be critical for some volatile compounds. Headspace may also be a consideration if the contents need to withstand any changes in pressure.
The slight vertical ridge that runs through the neck ring and the rest of the finish. The seam indicates where two halves of the finish molds were joined.
The part of the bottle that joins the wide main body and the narrower neck. The slope of the shoulder is one factor in determining how quickly a product will be dispensed when the bottle is inverted.
The main part of the bottle where the sidewalls are usually (but not always) vertical.
Some plastic bottles can have a flat area on the body of the bottle that can accept the application of a label. Label panels are sometimes recessed to protect the labels from rubbing together during shipping and the edges from fraying.
The entire lower part of the bottler below the sidewalls. The bottom includes the heel, base and pushup. The bottom may have letters and symbols molded into it that indicate the number of the mold cavity that produced the container and the manufacturer. The manufacturer symbol is called a "punt mark". The bottom also may have a small projection that serves as a registration device for labeling and decorating equipment. The device also can take the form of a small recess along the heel of the container.
The bottom plate is the part of the mold the shapes the bottom of the container. The parting line is a slight horizontal ridge formed in the joint between two parts of the mold.
The lower part of the bottle where the body (sidewall) turns from vertical to horizontal. The heel joins the sidewall to the bottom-bearing surface and may have a small recessed spot that serves as a registration device for labeling and decorating equipment.
An even bearing surface that forms a ring around the outside of the bottom upon which the bottle rests. On glass containers, this ring usually is given a stippled finish in the mold to mask scratches that occur during handling. Concentrating abrasions on the stronger high points of this raised pattern prevent the container from being weakened. The base is inside and underneath the heel and surrounds the pushup.
An inward dome in the center of the base. The resulting ring around the outside of the bottom ensures stability, providing an even bearing surface upon which the bottle rests. The pushup is exaggerated on some bottles, such as wine bottles.
 Home > News